I've been known to sometimes spend up to an hour editing a same picture on my iPhone just because I'm not satisfied with it! Sadly, I do not possess any skills for using photoshop nor do I own the software. I wish I did though, but then again I doubt I will be able to learn how to use it. So I just stick to what's handy: editing photos from my iPhone straight!
Here are my 9 favourite photography apps from the App Store, some have asked me if they can be found on the Google Play Store for Android but honestly I don't know. This is one reason why I cannot use an adroid phone! Furthermore, idk why but Samsung phones cause most high resolution photos become pixelated when uploaded to social media platforms like Instagram. (anybody can enlighten me as to why this is so?)

I will number the apps according to how they are arranged here in my folder! PhotoWonder being number 1 and VSCOcam number 9. I won't go according to sequence because I use a few apps together to edit most photos.
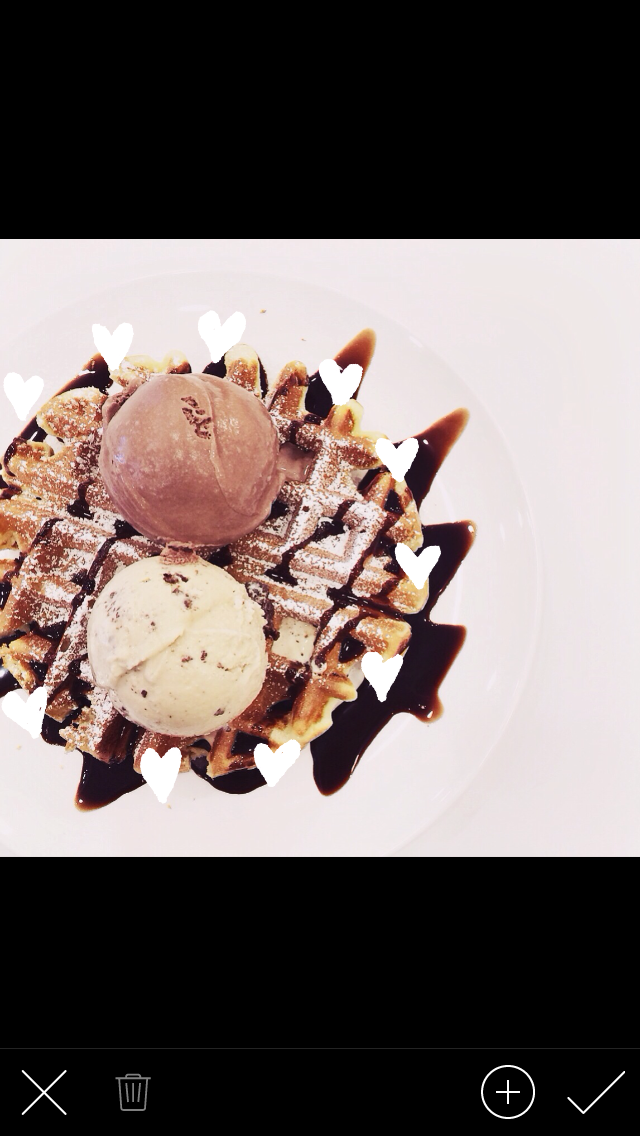
1. PhotoWonder. I use this app mostly only for its HDR effect which no other apps can match up to! This comes in super handy for food photos.


This was done with only the HDR effect! So much difference right, the food immediately looks so much more appetizing. This was my lunch in school, NTU canteen A last week, with my bestie Rachel. It doesn't look very nice but it was a satisfying and affordable meal! Okay anyway yes PhotoWonder is wonderful! Albeit only for this effect hahaha.
Pathway: Photowonder > edit > select pic > effects > classic > HDR
2. 美图秀秀! This is one of my favourite app because it makes flawless skin possible


See the difference? ^^ anyway my favourite effect is this one, 2nd from the back. The default intensity is 100% but that is often too much and make the picture too fake! So I always toggle it to around 40% because I will still use other apps to edit the pic hahaha.
Pathway: 美图秀秀 > 人像美化 > 一键美颜 > choose effect
3. Snapseed! Also one of my favourites because selective editing is really really useful


Such a beautiful picture of the Arc de Triomphe right? Achieved only by using Snapseed's selective adjustment! Anyway, I didn't even know Snapseed could do this until I took this photo in Paris last year and realized that the Arc is too dark! But if I brighten the whole picture, the Arc doesn't stand out. So I just selected that area and kept increasing the brightness until... wow such a pretty sky! Just nice it was evening and the sun was setting when I visited this place, casting beautiful hues over the place!
(And also, this was actually a panorama shot, see the people at the bottom they moved hahaha)
Pathway: Snapseed > selective adjustment
5. Whitagram. Essential to square photos for Instagram

I wouldn't recommend changing the color of the border even though there's this option available. More often than not, white borders work best, and black sometimes.
Featuring my golden retriever Lucky here! He has his own Instagram account @luckygoldenretriever filled with super cute photos of his big eyes and handsome mane of pure breed goodness. ^^ So click and follow!
Pathway: Whitagram > select pic > edit with aviary to crop if necessary > save/instagram
7. Camera360. Pic-saver when it comes to yellowish photos

.jpg)
See how I look so yellow in the first pic! After using Camera360 I look better. Of course the picture needs more edits but this is the first edit I do to make my skin less yellow. Works on picture taken under yellow lighting or too much saturation as well.
Pathway: Camera360 > import > select pic > edit > effects > magic skin > light/deep
8. PicsArt! This needs no introduction as the popular overlay app

This is how I add an overlay to my picture! Of course you have to have the picture of the overlay saved in your phone first as well. Opacity can be toggled as well. If you wanna choose another overlay, simple click the delete dustbin and click the plus sign to add another photo! Multiple overlays can be added.
Pathway: PicsArts > edit > select pic > add photo > select overlay > screen/lighten
Gonna show how I use the rest of the apps to edit a picture of my NTU volleyball team when we went to support Lyvia for Hall 15 production.


First up I used the beauty app from China 美图秀秀, my favourite effect again, just at 40%.
9. VSCOcam. My favourite effects are C1, F2, T1
6. Afterlight! Favourite effects include Russ and Relic, and Clarify is just awesome


Then I proceeded to VSCOcam to use the vibrant effect C1, at intensity level of 7 (out of 12).
Followed by Afterlight, using Clarify at 30%. This makes our faces brighter and actually brings out the contrast, yet works a lot better than the contrast tool. If the effects of VCSOcam doesn't suit by picture, I will try using Afterlight's guest effect of Russ or original effect of Relic.
Okay then here comes the problem! After I used Afterlight for the clarify, all of us look brighter and prettier EXCEPT my two friends at the back.
Okay then here comes the problem! After I used Afterlight for the clarify, all of us look brighter and prettier EXCEPT my two friends at the back.

Because I cannot stand their dark faces, I proceeded to use Snapseed's selective adjustment to increase brightness. After clicking selective adjustment, click on the plus sign and select the part of the picture you want to edit. The part will be selected in a circle which you can make the area smaller/bigger. For this, I selected one face and made the circle area small just to fit the face and swipe right to increase brightness. Swipe down/up to toggle between adjusting brightness, contrast or saturation. See both their faces has a 'B' on them cause I was adjusting the brightness. When contrast/saturation is selected, C or S will appear respectively. Anyway, selective adjustment only allows for editing of this 3 features. But Snapseed's option of 'tone image' from the main page allows you to toggle warmth, shadows and ambience as well.
4. Moldiv. Used for photo collage as well as texts. Phonto works as well for fonts/texts but I rarely insert texts into my photos.
4. Moldiv. Used for photo collage as well as texts. Phonto works as well for fonts/texts but I rarely insert texts into my photos.


Okay well finally the photo editing is done! I used Moldiv for this collage, and just want to let you know that you can click on Frame Adjust and toggle the size of the collage, where the ratio 9:16 is iPhone 5/5s wallpaper size. Handy for creating wallpaper collages!
TADA ~ the before and after photo, edited my way

I'm just sharing the apps I use to edit photos my way, and I'm sure everyone else has their own style of editing photos as well! Another app which girls may be interested in is 美人相机 where liquify can be used to look skinnier hahaha. But that requires a lot of patience and time to make sure the picture does not look distorted after you're done with slimming yourself! I can never be bothered and if I look too fat/ugly in photos I just don't post hahaha! Anyway, the tutorial for this app is available on Xiaxue's Guide to Life episode 145 Best Photo Apps, which is also a must-watch to make your photos look prettier and instagram-worthy. (;
Any good photography apps that I'm missing on do let me know! Feel free to also ask me questions by leaving a comment or emailing me.
Any good photography apps that I'm missing on do let me know! Feel free to also ask me questions by leaving a comment or emailing me.
xoxo, kaitinghearts


No comments